|
MFK-05 Series RC Car
Controller |
MFK-05,
a integrated RC Car/Racer controller,
for
upgrading RC Off-Road Car into proportional
radio control
with Light and Sound Effect

 MFK series controller
uses 6 channels RC system to control R/C truck forward/backward movement,
turning,
Programmable ESP(
Electronic Stability Program) support
Miniature design
allowed your to
keep interior of
diver cabin
60A motor driver
22KHz, 8-bit high quality sound with digital sound
mixer
10W
sound output power
Support vibrate motor
Support
True-HID head light effect
Safety shutoff prevents
unwanted movement while signal lost
Auto R/C signal detection, suitable for 27M, 72M and 2.4G RC system
Dual
Motor Support
Support 3S Li-Po battery MFK series controller
uses 6 channels RC system to control R/C truck forward/backward movement,
turning,
Programmable ESP(
Electronic Stability Program) support
Miniature design
allowed your to
keep interior of
diver cabin
60A motor driver
22KHz, 8-bit high quality sound with digital sound
mixer
10W
sound output power
Support vibrate motor
Support
True-HID head light effect
Safety shutoff prevents
unwanted movement while signal lost
Auto R/C signal detection, suitable for 27M, 72M and 2.4G RC system
Dual
Motor Support
Support 3S Li-Po battery
|
|
MFK-05 |
MFK-05E |
|
Remote Control System
|
Traditional 6-CH AM, FM or 2.4G RC system |
Traditional 6-CH AM, FM or 2.4G RC system |
|
Engine Sound Simulation
|
Multi
Simple Set,
Fuzzy
Logic |
Engine
Load detection,
Multi
Simple Set,
Fuzzy
Logic |
|
ESP
|
NO |
YES |
|
Motor driver Current
|
60A ( 540/550 Motor) |
60A ( 540/550 Motor) |
|
Kit contained |
MFK-05 board *1, channel cable*4 |
MFK-05-ESP board *1,
channel cable*4
ESP module*1 |
|
Reference Price |
150 |
249 |
|
Product
Identification System |
*Sound set code info is on "Sound
Set Code" page
|
Control Mode and operation |
|
 |
Steering Left and Right |
CH1 |
|
 |
Throttle Up |
CH2 |
|
 |
Break, break force is proportional to stick
angle |
CH2 |
|
 |
Horn
|
CH3 |
|
 |
Engine On/Off
|
CH3 |
|
 |
Right: Turn indicator
Left: Turn indicator
|
CH4 |
|
 |
Aux Light On -> Head Light On -> Fog Light On
-> Lights Off |
CH5 |
|
 |
Right:
Hazard light |
CH5 |
|
|
Shift to Neutral
gear |
CH6 |
|
 |
Shift in |
CH6 |
|
|
Shift to
Reverse gear |
CH6 |
|
|
Rotating Light On/Off |
CH7 |
|
|
Controlled Switch On/Off |
CH7 |
|
|
|
|
|
|
|
|
|
Parameter
|
|
Unit
|
|
Maximum current of track ESC |
60 |
A |
|
Maximum current of turret and
cannon elevation ESC |
7 |
A |
|
Maximum current of Smoker Driver |
7 |
A |
|
Maximum supply
voltage |
11.4
|
V |
|
Minimum supply
voltage |
7.2 |
V |
|
On-board audio amplifier |
10 |
W |
MFK series connector and pin assignments
|
Connector
|
Description
|
Note |
|
SW |
Switch Cable Port |
Connect to switch cable
|
|
CN1
|
Battery Power
|
1. Battery +
2.
Battery -
|
|
CN2 |
IR Configuration
Port |
1.
IR
Configuration
receiver +
2.
IR
Configuration
receiver SIG
3.
IR
Configuration
receiver -
4. IR
Configuration Indicator/AUX Light
LED -
5. IR
Configuration Indicator/AUX Light
LED + |
|
CN3 |
NOT USED |
|
|
CN4 |
Sound
Volume |
1.
Volume Signal
Output (
Wiper pin of VR
)
2. Battery -( 1 outside pin of
VR )
3.
Volume
Signal
Input (
1 outside pin of VR ) |
|
CN5 |
Speaker |
|
|
CN6
|
Driving Motor 1
|
|
|
CN7
|
Driving Motor 2 |
|
|
CH1
|
Steering control
signal,
|
Futaba: CH1
JR:AILE
|
|
CH2
|
Throttle
control
signal
|
Futaba:
CH2( Mode 2) or CH3 ( Mode 1 )
JR:ELEV
|
|
CH3 |
Multi function control
signal 1 |
Futaba:
CH3( Mode 2) or CH2 (
Mode 1 )
JR:THRO
|
|
CH4
|
Multi function control
signal 2
|
Futaba: CH4
JR:RUOD
|
|
CH5
|
|
|
|
CH6
|
|
|
|
CH7
|
Reverse Light |
1.
Reverse
Light
LED +
2.
Reverse
Light
LED -
3. NC |
|
CH8
|
MG Light |
1.
MG Light
LED +
2.
MG Light
LED -
3. NC |
|
CN9 |
Light
Effect Functions |
1. Left turn indicator (LED)-
2. Right turn indicator (LED)-
3. Left and Right turn indicator (LED)+,
Engine Vibration
Motor +
3. Engine Vibration
Motor
-
5. HEAD Light -
6. HEAD Light +
7. FOG Light +
8. FOG Light - |
|
CN10 |
Smoker Heater |
|
|
CN11 |
Smoker Heater Switch |
|
|
CN12 |
Smoker Fan/Compressor |
|
|
J1 |
Roof Light LED |
1. LED +
2. LED - |
|
J2 |
|
|
|
J3 |
Break Light Port |
1.
Break Light
LED +
2.
Break Light
LED - |
|
J4 |
Gear
Shift
Servo Port |
1. Signal( White Wire)
2.
+5V ( Red Wire)
3. Battery - (Black Wire) |
|
J5 |
|
|
|
J6 |
ESP port
(Electronic
Stability Program) |
To
connect GBS (Gun Barrel Stabilizer) unit |
|
J7 |
NA |
|
|
J8 |
NA |
|
|
L1 |
Rotating
Light LED1
|
1. LED +
2. LED - |
|
L2 |
Rotating
Light LED2
|
1. LED +
2. LED - |
|
L3 |
Rotating
Light LED3
|
1. LED +
2. LED - |
|
L4 |
Controlled Switch |
1. Device +
2. Device -
Maximum Current : 7A |
|
L5 |
Rotating
Light LED4
|
1. LED +
2. LED - |
|
L6 |
Speed
Indicator LED1
|
1. LED +
2. LED - |
|
L7 |
Speed
Indicator LED2
|
1. LED +
2. LED - |
|
L8 |
Speed
Indicator LED3
|
1. LED +
2. LED - |
Under construction!
|
Personalization( Patent Pending) |
Settings
of MFK series board can be set by
Configuration IR remote and programming line(
as follow)
Type of Vehicle determines
Battle Date when doing IR battle( See
Variants section
)
|
Type of
Tank
|
Mobility
vs.
Hit taken |
|
Damaged
State |
Badly Damaged
State |
Destroyed
State |
|
Heavy* |
1~4
hits taken |
5~8
hits taken |
9
hits taken |
|
Medium |
1~3
hits taken |
4~5
hits taken |
6
hits taken |
|
Light |
1
hit taken |
2
hits taken |
3
hits taken |
|
HL Mode |
1~2
hits taken
(Note) |
3~4
hits taken
(Note) |
5
hits taken |
Steps
to set parameters:
STEP 1: Turn power off,
plug programming line
to CN2,
STEP 2: Install a jumper to J2
as shown below, turn power on,
STEP 3: Point
Configuration IR remote to
programming line
receiver,
refer to function table listed below and press the
button
of function that you want to set,
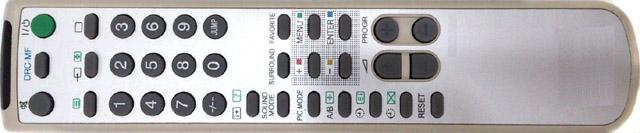
STEP 4: Indicator
of programming line flashes according to
the setting value.
STEP 5: turn power off, remove
jumper on J2, then power on and you are set.
Function tables:
Function Table Page Selection:
Press "-/--" Key on TV remote to select. for
TK22G2 only
|
Available Settings |
Indicator
flashes times |
Description |
|
Select
settings on Page 1 |
1* |
MFK board
goes back to this page after power on |
|
Select settings on Page 2
|
2 |
|
|
Select settings on Page 3
|
3 |
|
|
Select settings on Page 4 |
4 |
|
*Text in black means that
setting function is on page1.
Save
current setting to
PRESET 1: Press number
key "1" on TV remote to save,
|
Available Settings |
Indicator
flashes times |
Description |
|
Save to
PRESET 1 |
1 |
Indicator flashes when setting
is saved
|
Save
current setting to PRESET 2: Press number
key "2" on TV remote to save,
|
Available Settings |
Indicator
flashes times |
Description |
|
Save to
PRESET
2 |
2 |
Indicator flashes when setting
is saved
|
*Once
you've adjusted everything, you can
push "1" or
"2" to save
current setting to PRESET 1
or 2. If you don't do this saving the board remembers
the last settings.
Use saved settings:
Press "ENT" or "SOUND MODE" Key on TV remote to select.
|
Available Settings |
Indicator
flashes times |
Description |
|
Use
PRESET 1
setting |
1 |
|
|
Use
PRESET 2 setting |
2 |
|
|
Use Factory Default Setting
( Read-Only ) |
3 |
To
restore factory
default value in case of setting data is messed up. |
*To
switch between the presets you press either "sound
mode" or "enter" button, once the preset is selected,
switch tank off and remove setup jumper. Switch back on and away you
go.
Mixer Mode:
Press  (MUTE) key on TV remote to select. ( Vibrate motor strength )
|
Available Settings
|
Indicator flashes times
|
Description
|
|
Mixer Mode
1
|
1* |
Tank mode 1
CH1 controls
rudder, CH2
controls throttle.
Proportional steering,
sharp and pivot turn* are supported
|
Left Track
|
Right Track
|
|
Pivot
Turn |
Sharp
Turn |
Proportional
Steering |
Proportional
Steering |
Sharp
Turn |
Pivot
Turn |
|
|
Mixer Mode
2 |
2 |
OFF mode
CH1
controls left track, CH2 controls right track |
|
Mixer Mode
3
|
3 |
Tank mode 2
CH1 controls
rudder, CH2
controls throttle,
Proportional steering and
sharp turn are supported
|
Left Track
|
Right Track
|
|
Sharp
Turn |
Proportional
Steering |
Proportional
Steering |
Sharp
Turn |
|
|
Mixer Mode
4
|
4 |
Half-Track mode
CH1 controls
rudder, CH2
controls throttle,
Support proportional steering only.
Max. turn
ratio ( speed ratio of left and right track at hard left and right turn)
can be
configured form
large (4)
to small (8)
|
Left Track
|
Right Track
|
|
Proportional
Steering |
Proportional
Steering |
|
|
Mixer Mode
5
|
5 |
|
Mixer Mode
6
|
6 |
|
Mixer Mode
7
|
7 |
|
Mixer Mode
8
|
8 |
*pivot
turn is also named as super spin.
Main Gun Function Mode:
Press
"POWER" key
on TV remote to select
|
Available Settings
|
Indicator
flashes times
|
Description
|
|
TAMIYA RECOIL MODE*
|
1* |
To use TAMIYA recoil unit,
CN3,
Pin4:TAMIYA
Recoil Unit Switch
CN3,
Pin5:TAMIYA
Recoil Unit Switch
CN9, Pin3:TAMIYA
Recoil Unit green Wire
CN9, Pin4:TAMIYA
Recoil Unit white Wire
|
|
HL AirSoft MODE
|
2 |
To use HL AirSoft,
CN3,Pin4:HL
AirSoft Unit Switch
CN3,Pin5:HL
AirSoft Unit Switch
CN9,Pin3:HL AIRSOFT Motor +
CN9,Pin4:HL
AIRSOFT Motor -
|
|
HL Recoil MODE
|
3 |
To use HL Recoil unit,
CN3,Pin4:HL
Recoil Unit Switch
CN3,Pin5:HL
Recoil Unit Switch
CN9,Pin3:HL
Recoil
Motor +
CN9,Pin4:HL
Recoil
Motor -
|
|
Gun elevation servo Mode |
4
|
CN3,Pin4:NC
CN3,Pin5:NC
CN9,Pin3:AUX POWER +
CN9,Pin4:AUX
POWER -
J4.1. Signal( White Wire)
J4.2.
+5V ( Red Wire)
J4.3. Battery - (Black Wire)
*This function
is only available on TK22 |
*Use this mode on Hooben Tank.
IR
Battle Preset Data: press "MTS" or "A/B" Key on TV remote to select
|
Available Settings
|
Indicator
flashes times
|
Description
|
|
TAMIYA Heavy tank
|
1* |
Reload Time = 9 seconds,
Invulnerability time = 10 seconds,
Max. hit can
take = 9 hit. |
|
TAMIYA
Medium tank |
2 |
Reload Time = 5 seconds,
Invulnerability time = 12 seconds,
Max. hit can
take = 6 hits |
|
TAMIYA
Light tank |
3 |
Reload Time = 3 seconds,
Invulnerability time = 15 seconds,
Max. hit can
take = 3 hits. |
|
Heavy Armored Vehicle
|
4
|
Invulnerability time = 10 seconds,
Max. cannon hit cam take = 1 hit
Max. machine gun hit can take = 24 hit. |
|
Medium
Armored Vehicle
|
5 |
Invulnerability time = 10 seconds,
Max. cannon hit can take = 1 hit
Max. machine gun hit can take = 16 hit. |
|
Light
Armored Vehicle
|
6
|
Invulnerability time = 10 seconds,
Max. cannon hit can take = 1 hit
Max. machine gun hit can take = 8 hit. |
|
HL tank
|
7
|
Reload Time = 3 seconds,
Invulnerability time = 10 seconds(Note1)
Max. hit can
take = 5 hits, |
|
Reserved
|
8
|
|
Note1: Reference setting for HL
Tank
Momentum effect On/Off: Press "SLEEP(0x36)"
or " "
on TV remote to select "
on TV remote to select
|
Available Settings
|
Indicator
flashes times
|
Description
|
|
Off
|
1* |
|
|
ON
|
2
|
|
*This function
is only available on TK22
Reload Sound On/Off: Press "Timer
Off(0x3C)"
or "
 "on TV remote to select "on TV remote to select
|
Available Settings
|
Indicator
flashes times
|
Description
|
|
On
|
1* |
|
|
Off
|
2
|
|
*This function
is only available on TK22
Taking
a hit hull recoil On/Off: Press "JUMP(0x3B)"
on TV remote to select
|
Available Settings
|
Indicator
flashes times
|
Description
|
|
On
|
1* |
|
|
Off
|
2
|
|
*This function
is only available on TK22
Strength of
taking a hit hull recoil:
Press "CH Up" or
"PROGR +" key
on TV remote to select
|
Available Settings
|
Indicator
flashes times
|
Description
|
|
1
|
1 |
Small( 1 ) to Large( 16
)movement
|
: |
: |
|
6
|
6* |
|
:
|
:
|
|
16
|
16
|
Firing
tank gun
hull
recoil On/Off:
Press "SURROUND(0x29)"
on TV remote to select
|
Available Settings
|
Indicator
flashes times
|
Description
|
|
On
|
1* |
|
|
Off
|
2
|
|
*This function
is only available on TK22
Strength of
firing tank gun
hull
recoil:
Press
"VOL UP" key on TV remote
to select
|
Available Settings
|
Indicator
flashes times
|
Description
|
|
1
|
1 |
Small( 1 ) to Large( 16
)movement
|
|
: |
: |
6 |
6* |
: |
: |
|
16
|
16
|
RealRecoil servo direction:
press "CH down"
or "PROGR -" key
on TV remote to select
|
Available Settings
|
Indicator
flashes times
|
Description
|
|
Normal
|
1* |
|
|
Reversed
|
2 |
|
Gun elevation servo direction:
press " Teletext
ON(0x3F)" or " " key
on TV remote to select " key
on TV remote to select
|
Available Settings
|
Indicator
flashes times
|
Description
|
|
Normal
|
1* |
|
|
Reversed
|
2 |
|
*This function
is only available on TK22
Speed
reduction
in damaged state:
press "3"
key on TV remote
to select.
|
Available Settings
|
Indicator
flashes times
|
Description
|
|
0%
|
1 |
No mobility damage simulation, Speed is not
reduced when Tank is in damaged state. |
|
-12.5% |
2* |
|
|
-25% |
3 |
|
-37.5% |
4 |
|
-50% |
5 |
|
-62.5% |
6 |
|
-75% |
7 |
|
-87.5% |
8 |
|
Speed
reduction
in
badly damaged
state:
press "DISPLAY"
or "DRC-MF" key on TV remote to
select.
|
Available Settings
|
Indicator
flashes times
|
Description
|
|
0%
|
1 |
No mobility damage simulation, Speed is not
reduced when Tank is in badly damaged state. |
|
-12.5% |
2 |
|
|
-25% |
3* |
|
-37.5% |
4 |
|
-50% |
5 |
|
-62.5% |
6 |
|
-75% |
7 |
|
-87.5% |
8 |
|
Armor type:
press number
key "9" on TV remote to select
|
Available Settings
|
Indicator
flashes times
|
Description
|
|
Heavy Armor |
1* |
Resistance to machine gun
|
|
Soft
skin, like Trucks |
2
|
No resistance to machine gun
|
Sending IR code when firing
machine gun:
press number
key "6" on TV remote to select
|
Available Settings
|
Indicator
flashes times
|
Description
|
|
Not
to send
MG
IR code
|
1* |
|
|
To send MG IR code |
2
|
|
Primary weapon reload time:
press number
key "4" on TV remote to select
|
Available Settings
|
Indicator
flashes times
|
Description
|
|
3 seconds
|
3 |
|
|
4 seconds
|
4 |
|
|
5 seconds
|
5 |
|
|
6 seconds
|
6
|
|
|
7 seconds
|
7
|
|
|
8 seconds
|
8
|
|
|
9 seconds
|
9*
|
|
|
10
seconds |
10 |
|
|
11 seconds
|
11 |
|
|
12
seconds |
12 |
|
|
13
seconds |
13 |
|
|
14
seconds |
14 |
|
|
15
seconds
|
15
|
|
Rounds of Primary weapon:
press number
key "8" on TV remote to select,
|
Available Settings
|
Indicator
flashes times
|
Description
|
|
Not
limited
|
1* |
|
|
8 rounds
|
2 |
|
|
16 rounds
|
3 |
|
|
24 rounds
|
4
|
|
|
32 rounds
|
5
|
|
|
40 rounds
|
6
|
|
|
48 rounds
|
7
|
|
|
56 rounds
|
8 |
|
|
64 rounds
|
9 |
|
|
72 rounds
|
10 |
|
|
80 rounds
|
11 |
|
|
88 rounds
|
12 |
|
|
96 rounds |
13 |
|
|
104 rounds |
14 |
|
|
112
rounds |
15 |
|
|
120
rounds |
16 |
|
Primary weapon
IR code:
press number key "0" on TV
remote to select
|
Available Settings
|
Indicator
flashes times
|
Description
|
|
TAMIYA cannon code
|
1* |
For TAMIYA IR battle
|
|
HL cannon code
|
2
|
For HL IR battle
|
|
Repair
code
|
3
|
For Bergepanzer
application,
damage count decreased by 1 when this IR
code is received, each repair needs 15s, no other vehicle
can damage vehicle that is
under this mode
|
|
Machine Gun code
|
4
|
Vehicle
with MG |
Invulnerability time:
Vehicle is Invulnerable during
this period,
press number
key "7" on TV remote to select
|
Available Settings
|
Indicator
flashes times
|
Description
|
|
Vehicle can not be recovered from destroyed mode
|
1 |
|
|
1 second
|
2 |
|
|
2 seconds |
3 |
|
|
3 seconds |
4 |
|
|
4 seconds
|
5 |
|
|
5 seconds
|
6 |
|
|
6 seconds
|
7
|
|
|
7 seconds
|
8
|
|
|
8 seconds
|
9
|
|
|
9 seconds
|
10
|
|
|
10
seconds |
11* |
TAMIYA
Heavy tank |
|
11
seconds
|
12 |
|
|
12
seconds |
13 |
TAMIYA
Medium tank |
|
13
seconds |
14 |
|
|
14
seconds |
15 |
TAMIYA
Light tank |
|
15
seconds
|
16
|
|
Max hit can take:
Press number key "5"
on TV remote to select
|
Available Settings
|
Indicator
flashes times
|
Description
|
|
1 round
|
1 |
|
|
2 rounds |
2 |
|
|
3 rounds |
3 |
TAMIYA
Light tank |
|
4 rounds
|
4 |
|
|
5 rounds
|
5 |
|
|
6 rounds
|
6
|
TAMIYA
Medium tank |
|
7 rounds
|
7
|
|
|
8 rounds
|
8
|
|
|
9 rounds
|
9*
|
TAMIYA
Heavy tank |
|
10
rounds |
10 |
|
|
11
rounds |
11 |
|
|
12
rounds |
12 |
|
|
13
rounds |
13
|
|
|
14
rounds |
14 |
|
|
15
rounds
|
15
|
|
GBS LED enable:
press
"TV/VIDEO" or "->[]" Key on TV
remote to select
|
Available Settings
|
Indicator
flashes times
|
Description
|
|
Enabled
|
1* |
|
|
Disabled
|
2
|
|
Horizontal GBS motor Speed gain increase:
Select page 4 , press number
key "1" on TV remote to increase gain
|
Available Settings
|
Indicator
flashes times
|
Description
|
|
0
|
1 |
|
|
:
|
:
|
|
|
8
|
9
|
|
Horizontal GBS motor Speed gain
decrease:
Select page 4 , press number
key "4" on TV remote to increase gain
|
Available Settings
|
Indicator
flashes times
|
Description
|
|
0
|
1 |
|
|
:
|
:
|
|
|
8
|
9
|
|
Horizontal GBS motor Start gain
increase:
Select page 4 , press number
key "2" on TV remote to increase gain
|
Available Settings
|
Indicator
flashes times
|
Description
|
|
0
|
1 |
|
|
:
|
:
|
|
|
8
|
9
|
|
Horizontal GBS motor Start gain
decrease:
Select page 4 , press number
key "5" on TV remote to increase gain
|
Available Settings
|
Indicator
flashes times
|
Description
|
|
0
|
1 |
|
|
:
|
:
|
|
|
8
|
9
|
|
Horizontal GBS motor Stop gain increase:
Select page 4 , press number
key "3" on TV remote to increase gain
|
Available Settings
|
Indicator
flashes times
|
Description
|
|
0
|
1 |
|
|
:
|
:
|
|
|
8
|
9
|
|
Horizontal GBS motor Stop gain
decrease:
Select page 4 , press number
key "6" on TV remote to increase gain
|
Available Settings
|
Indicator
flashes times
|
Description
|
|
0
|
1 |
|
|
:
|
:
|
|
|
16
|
17
|
|
Horizontal GBS
sensitive
increase:
Select page 4 , press number
key "8" on TV remote to increase gain
|
Available Settings
|
Indicator
flashes times
|
Description
|
|
0
|
1 |
|
|
:
|
:
|
|
|
8
|
9
|
|
Horizontal GBS
sensitive
decrease:
Select page 4 , press number
key "0" on TV remote to increase gain
|
Available Settings
|
Indicator
flashes times
|
Description
|
|
0
|
1 |
|
|
:
|
:
|
|
|
16
|
17
|
|
Vertical GBS
slow
gain
increase:
Select page 3 , press number
key "1" on TV remote to increase gain
|
Available Settings
|
Indicator
flashes times
|
Description
|
|
0
|
1 |
|
|
:
|
:
|
|
|
8
|
9
|
|
Vertical GBS
slow
gain
decrease:
Select page 3 , press number
key "4" on TV remote to increase gain
|
Available Settings
|
Indicator
flashes times
|
Description
|
|
0
|
1 |
|
|
:
|
:
|
|
|
8
|
9
|
|
Vertical GBS
fast
gain
increase:
Select page 3 , press number
key "2" on TV remote to increase gain
|
Available Settings
|
Indicator
flashes times
|
Description
|
|
0
|
1 |
|
|
:
|
:
|
|
|
8
|
9
|
|
Vertical GBS
fast
gain
decrease:
Select page 3 , press number
key "5" on TV remote to increase gain
|
Available Settings
|
Indicator
flashes times
|
Description
|
|
0
|
1 |
|
|
:
|
:
|
|
|
8
|
9
|
|
Vertical GBS
servo angle
gain
increase:
Select page 3 , press number
key "8" on TV remote to increase gain
|
Available Settings
|
Indicator
flashes times
|
Description
|
|
0
|
1 |
|
|
:
|
:
|
|
|
8
|
9
|
|
Vertical GBS
servo angle
gain
decrease:
Select page 3 , press number
key "0" on TV remote to increase gain
|
Available Settings
|
Indicator
flashes times
|
Description
|
|
0
|
1 |
|
|
:
|
:
|
|
|
8
|
9
|
|
Engine deck level
increase:
Select page 3 , press
"VOL UP" on TV remote to increase level
Engine deck level
decrease:
Select page 3 , press
"VOL Down" on TV remote to decrease level
Engine deck level
Function Enable:
Select page 3, press
"MUTE" Key on TV
remote to select
|
Available Settings
|
Indicator
flashes times
|
Description
|
|
Disable
|
1 |
|
|
Enable
|
2*
|
|
Auto Load Position UP:
Select page 3 , press
"CH UP" on TV remote to increase level
Auto Load Position
Down:
Select page 3 , press
"CH Down" on TV remote to decrease level
Auto Load
Position Function Enable:
Select page 3, press
"POWER" Key on TV
remote to select
|
Available Settings
|
Indicator
flashes times
|
Description
|
|
Disable
|
1 |
|
|
Enable
|
2*
|
|
|